
Working in the laser industry, I often field questions about proper power and speed settings. These questions are often difficult to answer as there are numerous variables that must be considered when seeking the proper settings. The type of substrate, thickness of the substrate, and laser wattage all factor into what settings will properly mark the material. For instance, aluminum conducts energy much better than steel, a thicker substrate will remove energy much faster than a thinner one, and a higher power laser can deliver more energy than a lower power laser. So what is the magic equation that crunches these variables into a perfect power and speed setting?
Well, in short, there is no equation that can calculate the perfect setting. But, there is a method which will allow you to quickly and efficiently determine a proper power and speed setting for any type of substrate you choose to mark. The key is to make a power/speed grid.
First, obtain a piece of your substrate, spray it with your marking material and focus it in your laser. (A scrap piece of the substrate is best, if possible, because you will ruin it making the grid).
Next, design a varying power/speed grid. For example, on stainless steel:
Steel 100P/50S
Steel 100P/40S
Steel 100P/30S
Steel 100P/20S
Steel 100P/10S
In this grid, P stands for % Power and S stands for % Speed. Adjust your lasers settings to match your selected colors and mark the substrate.
After you have marked the object, you should observe a variation of marks. They should range from barely visible to a slight destruction of the substrate. Pick a pair of settings that give a durable mark of the appropriate color that also maximizes your lasing speed.
Using this method first, when marking a substrate for the first time, can save you time and money. You are sure to only waste one piece of your substrate while quickly finding the optimum settings for the marking you need to do.
If you are using a lower power laser, i.e. 25 or 30 watts, and having trouble marking certain substrates, here is another tip. You can increase your Dots Per Inch (DPI) and deliver more energy to the surface of the substrate. Most lasers have a default setting of 500 DPI, but can be increased to 1000 DPI.
-LaserStud
Monday, August 15, 2005
Thursday, August 11, 2005
CerMark Laser Marks Return From Space!
DPM Data Matrix Samples Retrieved from ISS
The following is condensed from the August 2005 UID Newsletter, published monthly by Acuity CiMatrix. This article was written by Don Roxby of the RVSI Symbology Research Center, Huntsville AL.
 Prior to the Space Shuttle Program, space-borne vehicles were expended; consequently their part identifiers were applied using marking processes designed for use in ground operations. With the advent of reusable space transportation vehicles and satellites, NASA needed to rethink how part identification markings were applied. Markings applied to reusable spacecraft need to survive the extreme enviroments encountered in space.
To support this new requirement, NASA approached RVSI to assist with a marking program to certify marking(s) for use in Low Earth Orbit (LEO). An experiment was designed to identify part identification methods and techniques that will survive the rigors of space. The experiment was to be designed to expose human and machine-readable markings to LEO environments. These include, but are not limited to, vacuum, solar UV radiation, micrometeoroids and space debris, atomic oxygen (AO) and deep thermal cycles. Working with the Boeing Phantom Works, RVSI Acuity CiMatrix’s Symbology Research Center applied markings to test coupons made of materials commonly utilized in the construction of the external components used on space transportation vehicles, satellites and space stations.
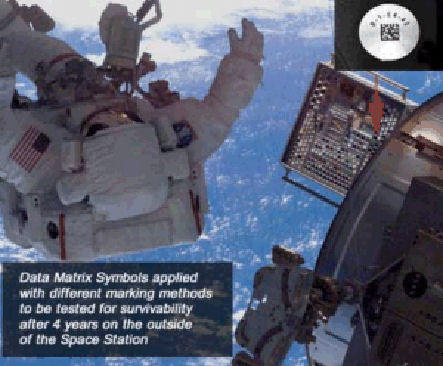
The test coupons consisted of 26 one-inch diameter disks, a 1-1/2-inch by 6-inch bar and a 4-inch square beta cloth blanket with fastener holes. The coupons were marked with labels, stenciled (additive) markings and direct markings applied using a wide range of different methods and techniques. (Note: CerMark's laser marking materials were a part of this test series) The material test coupons were then affixed to spaces provided on test panels, which were attached to the International Space Station (ISS) during a space walk conducted during the STS-105 Mission flown on August 10, 2001. The panels were positioned on the ISS so that they to could expect to receive the maximum amount of impact damage and exposure to a high degree of AO and UV radiation.
The experiments were recovered early during the STS-114 mission by Astronaut Stephen Robinson on July 30, 2005 when an opportunity presented itself during his record breaking six hours, fifty minute space walk. They were returned to earth on August 9, 2005. The marked coupons will be taken RVSI Acuity CiMatrix's Symbology Research Center where they will undergo a series of decoding tests designed to qualify identification processes for future retrievable spacecraft and satellites. Data from this in-orbit experiment will be added to NASA and military part marking standards.
For more information, contact Don Roxby droxby@rvsi.net , or visit www.uidsupport.com/newsletter/august_news/in_this_issue0508.htm
The following is condensed from the August 2005 UID Newsletter, published monthly by Acuity CiMatrix. This article was written by Don Roxby of the RVSI Symbology Research Center, Huntsville AL.
 Prior to the Space Shuttle Program, space-borne vehicles were expended; consequently their part identifiers were applied using marking processes designed for use in ground operations. With the advent of reusable space transportation vehicles and satellites, NASA needed to rethink how part identification markings were applied. Markings applied to reusable spacecraft need to survive the extreme enviroments encountered in space.
To support this new requirement, NASA approached RVSI to assist with a marking program to certify marking(s) for use in Low Earth Orbit (LEO). An experiment was designed to identify part identification methods and techniques that will survive the rigors of space. The experiment was to be designed to expose human and machine-readable markings to LEO environments. These include, but are not limited to, vacuum, solar UV radiation, micrometeoroids and space debris, atomic oxygen (AO) and deep thermal cycles. Working with the Boeing Phantom Works, RVSI Acuity CiMatrix’s Symbology Research Center applied markings to test coupons made of materials commonly utilized in the construction of the external components used on space transportation vehicles, satellites and space stations.
The test coupons consisted of 26 one-inch diameter disks, a 1-1/2-inch by 6-inch bar and a 4-inch square beta cloth blanket with fastener holes. The coupons were marked with labels, stenciled (additive) markings and direct markings applied using a wide range of different methods and techniques. (Note: CerMark's laser marking materials were a part of this test series) The material test coupons were then affixed to spaces provided on test panels, which were attached to the International Space Station (ISS) during a space walk conducted during the STS-105 Mission flown on August 10, 2001. The panels were positioned on the ISS so that they to could expect to receive the maximum amount of impact damage and exposure to a high degree of AO and UV radiation.
The experiments were recovered early during the STS-114 mission by Astronaut Stephen Robinson on July 30, 2005 when an opportunity presented itself during his record breaking six hours, fifty minute space walk. They were returned to earth on August 9, 2005. The marked coupons will be taken RVSI Acuity CiMatrix's Symbology Research Center where they will undergo a series of decoding tests designed to qualify identification processes for future retrievable spacecraft and satellites. Data from this in-orbit experiment will be added to NASA and military part marking standards.
For more information, contact Don Roxby droxby@rvsi.net , or visit www.uidsupport.com/newsletter/august_news/in_this_issue0508.htm
Thursday, August 04, 2005
What is Unique Identification (UID)?
The following is condensed from the UID support webpage, www.uidsupport.com, which is maintained by the RVSI Symbology Research Center.
Laser bonding and marking are MIL spec methods for meeting the requirements of UID.
UID is a new globally unique "part identifier" containing data elements used to track DoD parts through their life cycle.
UID Data is encoded into Data Matrix symbols that are applied to parts using Direct Part Marking processes (DPM). The DoD has moved to this transformation technology to facilitate electronic data capture and transmission.
UID is a mandatory DoD requirement for all solicitations issued on or after Jan. 1, 2004. The DoD Download --- The DoD Guide to UID - Version 1.5 requires the application of Data Matrix symbols to parts in the following categories:
• Costs over $5,000.
• Serially managed.
• Mission essential.
• Controlled inventory.
• A consumable item or material where permanent identification is necessary.
For more information, visit http://www.uidsupport.com/
Tuesday, August 02, 2005
Lining up a mark on an object
When marking with CerMark LMM-6000 or 6038, we use a useful technique here in the lab to help us line up our marks. To test the position of the mark, the LMM can first be discolored using very low power without bonding it to the metal. For example, if using a 35 watt laser, you can run the mark at about 10% power and 100% speed to see its position. The LMM will be discolored on the surface, but it won't be bonded to the metal. If the positioning is correct, you can then mark normally at 100% power and your usual marking speed. This can be very helpful in lining up an image on an odd shaped part.
Note: Be careful not to use too much power when trying this, if you bond any LMM to the part it will be very difficult to remove it without ruining the piece. It is better to start off too low in power than too high.
Sean
Note: Be careful not to use too much power when trying this, if you bond any LMM to the part it will be very difficult to remove it without ruining the piece. It is better to start off too low in power than too high.
Sean
Monday, August 01, 2005
LMM-6000 Frequently asked questions
LMM-6000 is CerMark's laser marking material for metals.
Q. How do I apply LMM-6000?
We recommend that LMM-6000 be applied by spraying directly onto the substrate to be marked. LMM-6000 can also be applied by brushing or painting, but care must be taken to ensure that an even coat is applied. Any variation in the coating such as brush marks may translate into variation in the final mark appearance. Spraying will give you the best results and the most evenly applied coating.
Q. How much LMM-6000 do I apply?
You should apply only enough LMM-6000 to hide the metal surface. Applying more LMM-6000 will result in having to use more laser power to create marks; it will not make the marks darker.
Q. How do I thin LMM-6000?
LMM-6000 can be thinned with denatured alcohol, ethanol, acetone or methyl ethyl ketone (MEK). Add the thinner to the LMM-6000 and stir or shake thoroughly. Isopropyl alcohol should be avoided.
Q. How much thinner do I need?
LMM-6000 can be used as is for brushing but should be thinned as needed to apply by spray. We recommend a maximum thinning ratio of 1 part LMM-6000 to 1 part ethanol for spraying. Ethanol can also be added to help aid in brushing, it will help brush marks flow out. MEK and acetone are stronger solvents; therefore less thinner will be needed when using these solvents.
Q. How do I clean LMM-6000 off of the metal?
LMM-6000 can be cleaned using plain water.
Q. What metals does LMM-6000 work on?
LMM-6000 has been tested on stainless steel, aluminum, brass, copper, nickel, silver, and titanium. LMM-6000 will not work on metals that have a coating or protective clear lacquer.
Q. How long will the marks last? How tough are they?
Marks made with LMM-6000 are permanent. Marks made with LMM-6000 are generally considered as tough as the metal they are made on. Physical testing has shown them to be resistant to many common strong acids, bases, organic solvents and extreme heat or cold. LMM-6000 also has good salt spray resistance, scratch resistance and QUV resistance.
Q. How high or thick are the marks?
Marks made with LMM-6000 have been examined by a scanning electron microscope and have been found to be approximately 10 microns, or 0.0004 inches (0.4 mil) high.
Q. Can I reuse LMM-6000?
LMM-6000 should not used if it has dried out. LMM-6000 also should not be reused by washing it off of a part and respraying the washed off material. Reused LMM-6000 will not produce a high quality mark. Performance characteristics will also be affected.
Q. What kind of laser do I need?
LMM-6000 can be used with CO2, YAG, or Fiber laser marking systems.
Q. How much power should I use?
The power settings that LMM-6000 will work best at vary depending on the laser being used. For example, with a 35 watt CO2 laser, marking on stainless steel requires the use of 100% power at a write speed of 4-8 inches per second. Marking on aluminum requires 100% power at a write speed of 1-4 inches per second with the same laser. A more powerful laser will be able to make the same mark using less power or writing faster. Also, aluminum, copper, brass and other soft, heat conductive metals require higher powers and slower writing speeds. These metals will conduct heat away from the marking area faster than steel, thus requiring more heat (power) to make a mark. Your power settings will vary depending on the laser used and the substrate being marked, so some experimentation may be necessary to achieve the best mark.
Q. Does LMM-6000 work on glass?
No. LMM-6000 is not to be used on glass surfaces. It is designed to work only on metal surfaces. CerMark also offers the LMC series products for laser marking on glass and ceramic substrates.
Q. Will LMM-6000 work on coated metals?
No. If the metal has a protective coating on it, the coating must be removed before it can be marked. The protective coating will interfere with LMM-6000’s ability to bond to the surface of the metal.
Q. Will LMM-6000 work on anodized metals?
LMM-6000 has generally been found to not work on anodized metals, but in some cases satisfactory results have been reported. We recommend experimentation if possible to determine if LMM-6000 will work in your particular application. The CerMark LMM-12, LMM-6046 and LMM-6018 tape can be used on anodized surfaces.
Q. How many marks can I get from 500 grams of LMM-6000?
When thinned and used as recommended, 500 grams of LMM-6000 should provide approximately 6000 square inches of coverage. The number of marks you can make will depend on the size of the mark and how much material you apply to the substrate.
Q. Can I get blacker marks with a thicker coat of LMM-6000?
No. Additional LMM-6000 film thickness will only result in more power being needed to make a mark; it will not make the marks any darker.
Q. What other colors for metal are currently available?
Currently we only offer a black mark on metal substrates. Research efforts are underway to develop additional colors for metal.
Any other questions, give me a call.....
Sean
(724) 229-5161
Subscribe to:
Posts (Atom)